SeSAC
7.31 ~ 8.4 TIL
예스코치
2023. 8. 9. 20:43
1. XIB(XML Interface Builder)
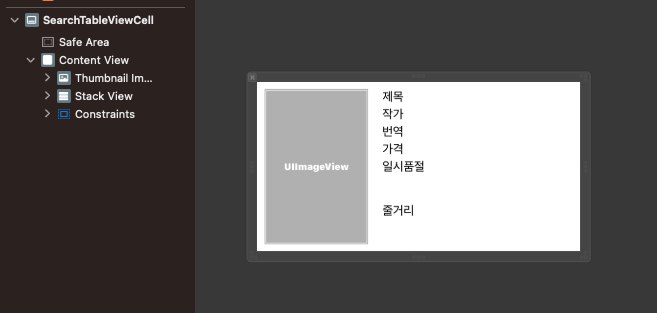
- 많이 사용되는 UI, 디자인은 xib 파일로 분리해서 사용하곤 함.
- xib로 생성한 Cell은 테이블뷰(컬렉션뷰)에 register 하는 과정이 필요하다.
func configureUI() {
    let nib = UINib(nibName: SearchTableViewCell.identifier, bundle: nil)
    tableView.register(nib, forCellReuseIdentifier: SearchTableViewCell.identifier)
    tableView.dataSource = self
    tableView.delegate = self

    ...

}- xib를 컴파일하면 nib으로 변환되기 때문에, nib 파일을 등록하는 것.
- UINib은 Interface Builder의 nib 파일을 래핑한 것으로, 메모리에 nib 파일을 캐싱했다가 필요할때 이를 언아카이빙하고 초기화함.
- Code-Base UI에서 Cell Identifier로 등록한 것과 달리, Xib로 생성한 Cell은 위처럼 UINib 인스턴스로 등록함.
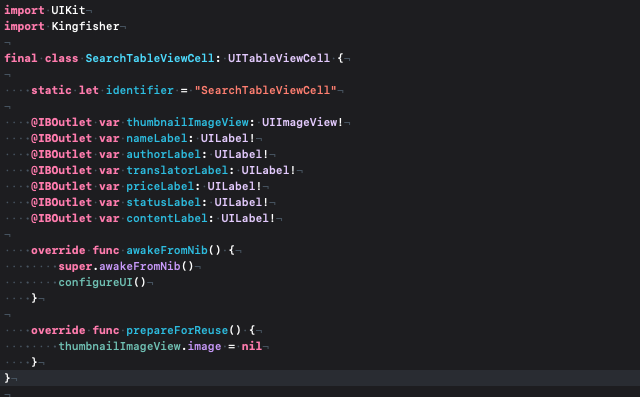
2. awakeFromNib
- awakeFromNib() 메서드를 통해 셀의 기본적인 UI 로직을 수행할 수 있음.
- Nib 파일로 생성되는 객체는 Initializer가 끝나고, awakeFromNib 메서드를 호출함.
3. Swipe Action(feat. custom swipe)
- canEditRowAt
- true를 반환할 시, 시스템 스와이프 편집 기능을 제공함.
- indexPath를 통해 유동적으로 적용 범위를 설정함.
- commit editingStyle
- 스와이프 했을때 수행할 로직을 구현함.
// 1.
override func tableView(_ tableView: UITableView, canEditRowAt indexPath: IndexPath) -> Bool {
    return true
}

// 2.
override func tableView(_ tableView: UITableView, commit editingStyle: UITableViewCell.EditingStyle, forRowAt indexPath: IndexPath) {
list.remove(at: indexPath.row)- custom swipe action
- leadingSwipeActionsConfigurationForRowAt: 왼쪽 스와이프 액션
- trailingSwipeActionsConfigurationForRowAt: 오른쪽 스와이프 액션
override func tableView(
    _ tableView: UITableView,
    leadingSwipeActionsConfigurationForRowAt indexPath: IndexPath
) -> UISwipeActionsConfiguration? {
    let action = UIContextualAction(
        style: .normal,
        title: nil
    ) { [weak self] action, view, completionHandler in
        self?.data[indexPath.row].isFavorite = true
        tableView.reloadRows(at: [indexPath], with: .fade)
        completionHandler(true)
    }
    action.image = .init(systemName: "star.fill")
    action.backgroundColor = .systemYellow
    return .init(actions: [action])
}

override func tableView(
    _ tableView: UITableView,
    trailingSwipeActionsConfigurationForRowAt indexPath: IndexPath
) -> UISwipeActionsConfiguration? {
    let action = UIContextualAction(
        style: .destructive,
        title: nil
    ) { [weak self] action, view, completionHandler in
        self?.data.remove(at: indexPath.row)
        tableView.reloadData()
        completionHandler(true)
    }
    action.image = .init(systemName: "trash")
    return .init(actions: [action])
}
4. appearance()를 활용한 전역설정
- appearance()를 통해서 UI 컴포넌트의 속성을 전역적으로 변경할 수 있음.
func application(
		_ application: UIApplication,
		didFinishLaunchingWithOptions launchOptions: [UIApplication.LaunchOptionsKey: Any]?
) -> Bool {
    // Override point for customization after application launch.

    UILabel.appearance().textColor = .white
    UITextView.appearance().textColor = .white

    return true
}
5. extension에서는 저장 프로퍼티를 사용할 수 없다
extension은 클래스, 구조체, 열거형 등의 타입을 확장하고, 추가 기능을 제공하기 위한 방법.
- 기존 타입에 저장 프로퍼티를 추가하면, 해당 타입의 일관성이나 안정성을 유지할 수 없게됨.
- 저장 프로퍼티는 메모리를 할당하고 초기화해야 하므로, 확장에서 저장 프로퍼티를 추가할 수 있게 하면 컴파일 시점에 복잡성과 모호성을 야기할 수 있음.
- 만약 저장 프로퍼티를 extension에서 사용할 수 있다면, 해당 타입의 initializer는 extension에서 추가한 저장 프로퍼티를 포함해야 하므로 이미 컴파일한 인스턴스를 다시 컴파일해야 될 것임.
이러한 이유로, Swift의 extension에서는 저장 프로퍼티를 선언할 수 없음.
6. minimumScaleFactor
- adjustFontSizeToFitWidth를 UILabel에 사용할때, minimumScaleFactor에 값을 지정해서 최소 라벨의 크기를 제한하는게 좋음.
- 그렇게 해야 Label의 크기에 맞게 폰트의 크기가 조절될 때, 너무 작게 줄어들지 않음.
func configureUI() {
    contentView.backgroundColor = .random
    contentView.layer.cornerRadius = 15.0
    nameLabel.font = .boldSystemFont(ofSize: 20.0)
    nameLabel.textColor = .white
    nameLabel.minimumScaleFactor = 0.6
    nameLabel.adjustsFontSizeToFitWidth = true
    nameLabel.numberOfLines = 1
    rateLabel.textColor = .white
    rateLabel.font = .systemFont(ofSize: 14.0, weight: .regular)
    favoriteButton.setImage(.init(systemName: "star"), for: .normal)
    favoriteButton.setImage(.init(systemName: "star.fill"), for: .selected)
}
7. KeyboardLayoutGuide (iOS 15+)
- iOS 15+ 부터 등장한 개념으로, view에 keyboardLayoutGuide이 있음.
- 키보드가 올라오면, 키보드를 경계로 레이아웃이 잡힘 → contentView의 bottom을 keyboardLayoutGuide의 top과 연결하면 키보드가 올라왔을때 알아서 키보드 상단에 맞게 레이아웃 조정이 들어간다.
func configureLayout() {
    scrollView.bottomAnchor.constraint(
        equalTo: view.keyboardLayoutGuide.topAnchor
    ).isActive = true
}
기존에는 NotificationCenter를 통해 (keyboardWillShowNotification, keyboardWillHideNotification) 직접 키보드에 대응해야 했는데, iOS 15 이상의 버전에 대해서는 keyboardLayoutGuide를 활용해서 코드 한줄로 키보드에 대응할 수 있다!
8. TextField를 탭했을때, 키보드 대신 PickerView 넣기
textField.inputView = pickerView
- textField.inputView: textField가 first responder일 때, 키보드 영역에 보여주고자 하는 Custom Input View
9. App의 시작 화면으로 이동하기(rootView 교체하기)
- 화면 전환으로 이를 구현하기에는 제약이 있음.
- 깔려있는 화면들은 다 날려버리는 작업이 필요함.
- ex) 앱의 테마 변경 시, 기존의 화면 계층은 모두 날려버리고 앱의 시작화면에서 다시 시작함.
window의 rootViewController를 교체하는 방식으로 이를 쉽게 구현할 수 있다.
let windowScene = UIApplication.shared.connectedScenes.first as? UIWindowScene
let sceneDelegate = windowScene?.delegate as? SceneDelegate

guard let viewController = UIStoryboard(
    name: "Main",
    bundle: nil
).instantiateViewController(
    withIdentifier: LibraryCollectionViewController.identifier
) as? LibraryCollectionViewController
else { return }
let nav = UINavigationController(rootViewController: viewController)

sceneDelegate?.window?.rootViewController = nav
sceneDelegate?.window?.makeKeyAndVisible()
✅ window의 rootViewController를 바꿔주는 시점에서 기존의 뷰 계층에 있던 뷰 컨트롤러들은 willDisappear, didDisappear를 호출함!
10. Protocol의 Optional
- 프로토콜 내에서 optional 키워드를 붙이면, 프로토콜 채택시 구현을 해도 되고 안해도 됨.
// 선택적 요청(Optional Requirement): 구현 객체에 따라 필요하지 않은 요소가 존재할수 있어서,
// 이를 방지하기 위해 옵셔널 형태로 지정할 수 있음
// Optional 키워드는 Class에서만 사용할 수 있음

@objc
protocol ViewPresentableProtocol {

    @objc optional var navigationTitle: String { get }
    var backgroundColor: UIColor { get }
    var identifier: String { get }

    func configureView()
    func configureLabel()
    @objc optional func configureTextField()
}

class B: UIViewController, ViewPresentableProtocol {
    var backgroundColor: UIColor {
        return .black
    }

    var identifier: String {
        return "BViewController"
    }

    func configureView() {
        <#code#>
    }

    func configureLabel() {
        <#code#>
    }
}- optional은 Class에서만 사용가능함 → Objc에서는 struct가 없었기 때문에, Objc의 기능을 이용하려면 클래스만 사용가능한 것!
기타
1. 하나의 Label VS 세개의 Label

- 많은 레이블(UI)를 사용할 경우, 스택뷰를 많이 쓸 경우, 화면 렌더링시 시간이 오래 걸림.
- 또한 배터리가 적을 경우, 디바이스 성능에 문제가 있을 경우에도 렌더링에 시간이 오래걸림.
따라서 가능하다면 UI 컴포넌트를 적게 사용하는 것이 성능적으로 좋음.
2. 열거형
- 열거형은 컴파일 타임에 결정되므로 인스턴스 생성이 불가능하다. 초기화가 불가능하다.
→ 따라서 인스턴스 프로퍼티 / 메서드 사용이 불가능하다. - static let과 case rawValue의 차이는?
- static let → 의미 단위로 다른 내용을 쓸 수 있음.
- case rawValue -> 중복되는 값은 추가할 수 없음.
// Enum: 컴파일
// 초기화 불가능, 인스턴스 생성 불가능 => 인스턴스 프로퍼티 / 인스턴스 메서드 사용 불가능!
// static let으로 값을 저장하는 것과 case rawValue로 값을 저장하는 것의 차이는?
// 1. static let -> 의미단위로 다른 내용을 쓸 수 있다
// 2. case rawValue -> 중복되는 값은 추가할 수 없음(rawValue는 독립적)
enum Grade: String {
    case A = "100점", B, C, D, E

    static let introduce = "학점"
}

Grade.introduce

enum ResourceString: String {
    case save = "저장"
    case add = "추가"
//    case addButton = "추가"

    static let addIcon = "추가"
    static let addButton = "추가"
}

ResourceString.add.rawValue
3. TextView에 Placeholder 적용하기
TextView는 기본적으로 placeholder를 지원하지 않으므로, 직접 구현해야 한다.
필요한 내용
- TextView에 텍스트가 없을때: placeholder text + placeholder color(gray)
- TextView에 입력할때, 텍스트가 있을때: 입력한 text + label color(black)
extension UITextView {
    func setupPlaceHolder(with text: String) {
        let spacing = 4.0
        self.textContainerInset = UIEdgeInsets(
            top: spacing,
            left: spacing,
            bottom: spacing,
            right: spacing
        )
        self.font = .systemFont(ofSize: 18)
        self.text = text
        self.textColor = .secondaryLabel
    }
}
extension DetailViewController: UITextViewDelegate {
func textViewDidBeginEditing(_ textView: UITextView) {
let bottomOffset = CGPoint(x: 0, y: scrollView.contentSize.height - scrollView.bounds.size.height + scrollView.contentInset.bottom)
scrollView.setContentOffset(bottomOffset, animated: true)
if textView.text == placeHolder {
textView.text = ""
textView.textColor = .black
}
}
func textViewDidEndEditing(_ textView: UITextView) {
if textView.text.trimmingCharacters(in: .whitespacesAndNewlines).isEmpty {
textView.setupPlaceHolder(with: placeHolder)
}
}
}- 입력을 시작할때: textView의 text가 placeHolder와 같다면 text를 비워주고 색상을 black으로 변경.
- 입력이 끝났을때: 개행, 공백을 제외한 text가 비어있다면(또는 placeholder와 같다면) placeholder text와 색상을 적용.